Combining Multiple SCOs Into One SCORM Course


The SCORM software standard is a reliable tool for creating elearning courses that will work across content platforms. But sometimes once you’ve created a catalog of courses, you want to make several courses into one, bundling together different chunks of content to create a new learning experience.
Over the last few months, we have assisted many elearning developers in SCORM packaging to create multi-SCO elearning courses. In response to popular demand, we’re pleased to share our step-by-step process: This process will combine multiple SCORM 1.2 packages into a single SCORM 1.2 package suitable for sale on OpenSesame.
This guide illustrates a very simple SCORM packaging strategy. Please contact us with any questions.
Note: If you use Adobe elearning authoring tools, check out this great video on how you can combine different SCOs into one SCORM package.
Step-by-Step Directions
-
Start by gathering all of the SCORM 1.2 packages you wish to combine. Unzip each package and create one folder for each, ensuring that each includes an imsmanifest.xml.
-
Look in each imsmanifest.xml file and compile a list of the filenames for each of the index files.
-
Create a parent folder and place all of the folders you made in step 1 into the parent folder.
-
Add each of the five standard files here to your parent folder. Four are .xsd files and do not need to be modified. The fifth, imsmanifest.xml, will need to be modified according to your individual SCORM 1.2 packages.
-
Modify the imsmanifest.xml file in the parent file to point to each of your sub-files. The imsmanifest.xml file must be modified in two places: in the organization tag and in the item tags. There must be a row for each subfolder.
-
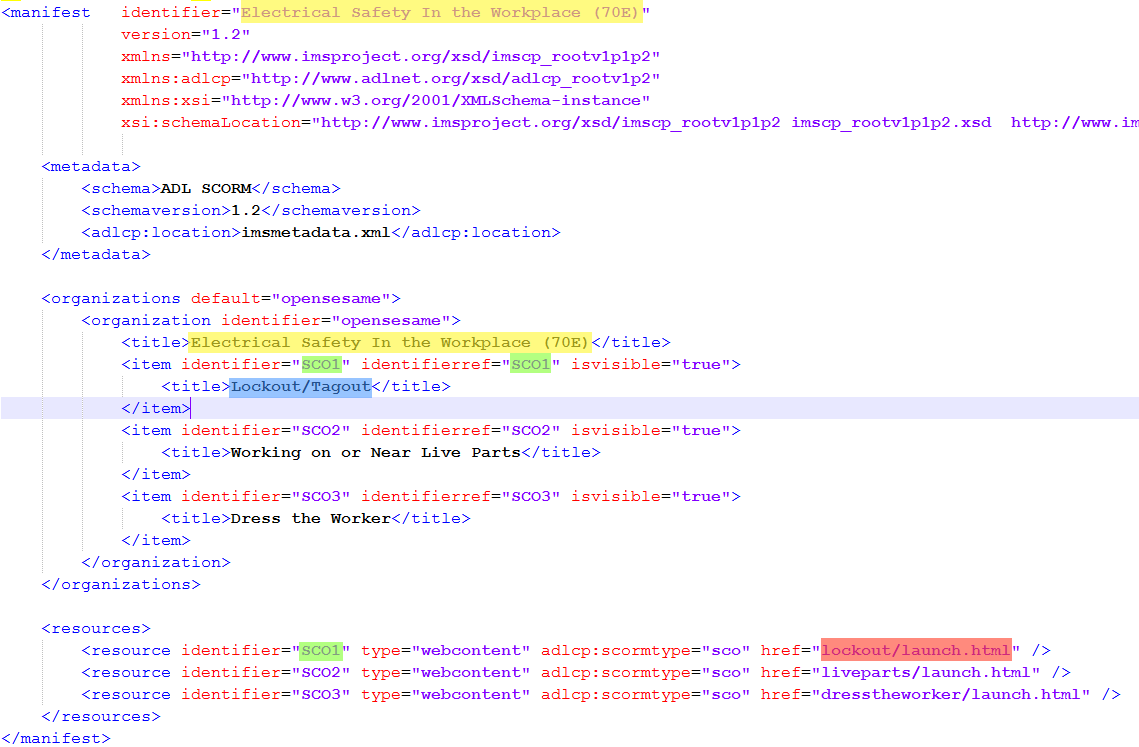
The screenshot example below illustrates a course created from three individual SCORM packages. Each of the following items must be modified:
-
“Identifier” and "Title" (Highlighted in Yellow in the image below) should refer to the course title - in this example “Electrical Safety In the Workplace (70E)”
-
Create an "item identifier" for each SCORM package you unzipped into a sub folder in step 1. Modify the title to reflect the name of each component of the course (See Blue highlighting). The title will show up in the course navigation so choose a name that describes the content. In this example, “Lockout/Tagout” is the first title tag that must be modified.
-
Create a “resource identifier” to map to each subfolder. Modify the content in quotes after “href” to reflect the file path and file name of the index file for each sub-folder (Highlighted in Red). The index file will be referred to in each individual SCO’s imsmanifest.xml, look for the href= attribute on the line containing adlcp:scormtype=”sco”
-
Make sure that the item identifiers are unique and that they match up to the corresponding resource identifiers (See Green Highlighting—click to enlarge).
-
-
If you're using SCORM 2004 3rd Edition, change this line in your master imsmanifest.xml file: "<schemaversion>1.2</schemaversion>" to "<schemaversion>2004 3rd Edition</schemaversion>."
-
Then zip the parent file SCORM package (containing all of the subfiles) and load it into OpenSesame.
-
When you validate the SCORM course in OpenSesame, you should see each link in the left-hand navigation of the course. Please click on and complete each one to demonstrate that the whole course can register as complete.
Now you’re ready to sell your new elearning courses in the OpenSesame elearning marketplace!
If you’re interested in deepening your understanding of the SCORM software standard, OpenSesame also offers SCORM training courses for elearning developers.