


If you have ever been on the hunt for a frequently used symbol and have let a few symbols slip yourself…
“@#$^, where is it again?!”
…then you’ll love this SNEAKY AutoCorrect workaround for getting the right symbol you’re looking for, every time!
So what’s the problem with inserting symbols in PowerPoint in the first place? Well, although there is a dialog box for inserting them, two problems off the top of my head are:
#1: Even though you’ve used it countless times, finding the dialog box again is never easy.
#2: If the symbol isn’t already in the frequently used symbol area (which can only hold 17 symbols), it takes forever to find the symbol you want…it’s not like they are conveniently listed alphabetically or anything!

So if you are like most people, you have a handful of symbols that you want to insert, and PowerPoint doesn’t exactly make it easy for you. For me, it’s the up, down, left and right arrow keys (↑↓←→), and those are the symbols I’ll be creating unique shortcuts for in the tutorial below…that said, this technique works for any symbol.
So what’s the trick?
The trick to creating your own unique shortcuts, what I like to call “text shortcuts,” is to use the AutoCorrect feature in PowerPoint. Below is a quick video for getting the job done, and below that is a short step-by-step walk through depending on what works best for you.
Video Tutorial
Written Tutorial
Step #1: You need get the symbol that you want to create inserted into your presentation and then copy it so that it’s on your clipboard. After we set this up, you will never have to find this symbol manually again, yeah!
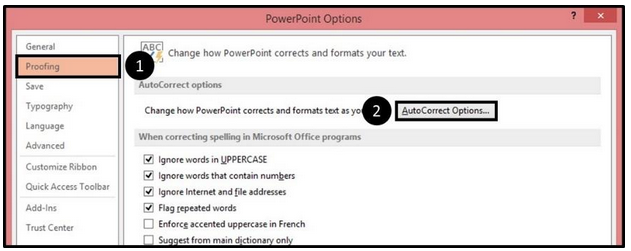
Step #2: Navigate to the AutoCorrect features in PowerPoint. In PowerPoint 2013 it is File → Options → proofing → and AutoCorrect Options.
Step #3: In the Replace box, you want to type a unique text string that you will use to insert your symbol (make it something that doesn’t conflict with existing shortcuts and that you’ll remember).
In the replace with, you want to insert your symbol. The symbol is already on our clipboard since we copied it, so all you have to do is hit Ctrl + V for paste.
In the dialog box below, you can see I’ve typed “uarrow” for replace and inserted “↑” for with:

Step #4: Test Your Symbol
If you now close the dialog box and in your presentation somewhere type your text string, in my case “uarrow,” and then hit the spacebar or some other form of punctuation, PowerPoint will automatically replace your text string with your symbol!
This beats the heck out of always trying to find your old symbols!
Step #5: Repeat for other symbols
Once you have one symbol set up, you can cycle back through any of your other symbols and set up a similar text shortcut to them, and place them directly beneath your fingertips.
Bonus Tip: This Works Everywhere!
Whatever text shortcuts you set up in PowerPoint will carry over in Microsoft Word and Excel. So you don’t need to set these up multiple times.
Note on Implementation: I do not recommend trying to come up with text strings for the THOUSANDS of symbols in Microsoft Office. I recommend setting these up as you run into situations, or projects, where you will need to reuse a specific symbol a lot!
Taylor Croonquist is the co-founder of Nuts & Bolts Speed Training which delivers actionable PowerPoint training courses for working professionals who spend hundreds, if not thousands, of hours a year using the program.